Getting the Tamagotchis
To build me a Tamagotchi hive, I would obviously need Tamagotchis. I wasn't planning on getting real ones: they are somewhat expensive, so it would cost me a fair amount of money to buy enough to build a hive. I also still didn't have hardware tools, so hacking them would be fairly hard.
Maybe I wouldn't have to do it the hardware way, though. Some years ago, I went to a talk by Natalie Sylvanovich, a hacker who has done some extraordinary work on reverse engineering the internals of the Tamagotchi Tama-town, one of the newer generations of Tamagotchi. This specific type of Tamagotchi has a port on the top where you can slide a Tama-Go onto. A Tama-Go is a figurine which has some contacts on the bottom. It contains either some copper bridges which activate some internal functionality in the Tamagotchi, or some ROM or flash that contains some external functionality that the Tamagotchi can access. The 'functionality' can be anything, from items to extra games.
Natalie basically decapped the CPU inside the Tamagotchi and found out it was a SunPlus/GeneralPlus GPLB5BX, which is basically a 6502 plus some timers, a LCD controller, a SPI-port, a bunch of GPIO and some RAM and ROM. She then figured out how to abuse the bytecode in the Tama-Go figurines to trigger a bug that made the 6502 jump into video memory. Combined with the already existing functionality to put custom images on the screen, this lead to a method of executing custom 6502 code. She then used this to get the ROM data out, disassembled the ROM and figured out a fair few secrets of Tamagotchi life.
As an aside: If you haven't seen it yet, I'd highly advise you to watch one of her talks: they're pretty informative as well as entertaining. I actually bought myself a Tamagotchi directly after hearing it, but unfortunately the rest of my schedule overwhelmed my Tamagotchi-hacking aspirations and the little critter ended up in a drawer somewhere.
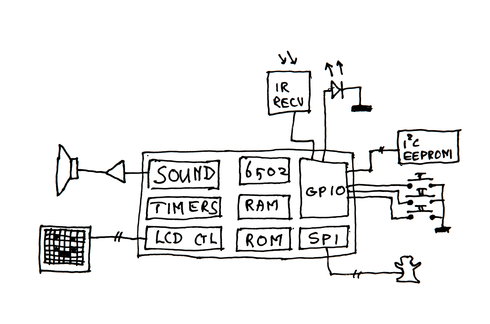
With the controller known (there's a fairly complete datasheet on the Internet) and the ROM dumped, it was possible to make a Tamagotchi emulator. This emulator would emulate all aspects of the hardware the Tamagotchi code runs on; the li'l Tamagotchi living inside it wouldn't know the difference between the real hardware and my software emulation. An emulator also has the advantage that it's very easy to make other software interact with the Tamagotchi, and spinning up a bunch of emulators only costs CPU power, not real money.
So, I set to work. I needed to write emulator code for a bunch of things: the CPU core, the timers, GPIO and other peripherials, and LCD controller. I also would need to emulate the other things on the Tamagotchi PCB: it contained an I2C EEPROM, an IR LED and receiver for inter-Tamagotchi communications and ofcourse the buttons and port for the Tama-Go.
The 6502 core isn't that difficult: because this chip has been used in the design for many home computers and game consoles, it has been emulated extensively. I took the M6502 library because I liked the fact that it has an internal debugger, but I could have just as easily taken any other emulator core.
The timers and interrupts were something I needed to implement myself. To save some CPU power, I implemented these with a certain granularity: the CPU core will execute a batch of instructions before the timer registers are updated. This makes emulation somewhat less accurate, but also less CPU-intensive. The Tamagotchi doesn't seem to mind this. The Tamagotchi can also stop its CPU until some condition occurs, and I also implement this in my emulator: not running the 6502 emulation, again, saves on CPU power.
The LCD was pretty easy to implement: the video ram is just a 4-bit monochrome framebuffer located somewhere in the 6502 address space. Because the LCD only is 48 by 32 pixels, I decided not to use a graphical library but to output the graphics to a terminal as ASCII-art.
The EEPROM was the first external part I implemented. The Tamagotchi code uses this to periodically save a snapshot of the state of the Tamagotchi; this way, if the Tamagotchi crashes or the batteries fail, you can just reset the Tamagotchi and it'll give you the option to download the state from the EEPROM. Especially with my emulator sometimes crashing and with me re-starting it every now and then to test new code, the EEPROM was invaluable: without it, I'd have to deal with the philosophical quandry of what happens to a Tamagotchi when you stop the emulation and it's not saved anywhere...
The Tamagotchi also contains sound hardware. This is fairly complicated hardware, but the Tamagotchi only ever writes to it. I could not implement the sound hardware and the Tamagotchi would be mute, but otherwise perfectly fine. I decided to go that route: the sound hardware wasn't documented really well and I didn't feel like having an entire hive of Tamagotchis bleeping at me for attention.
So after a good while of programming (the datasheet had some frustrating incongruencies), I could have
a Tamagotchi in my terminal:
