Display
So, what to use when building something like this? One of the ways that sprung to mind was to take a Raspberry Pi or something, add a 2.5" LCD, add an emulator like PCE or MiniVMac, 3d-print an enclosure and call it a day. But I didn't feel that would do my idea justice: not only would it be too big for my tastes, it also would be too easy: With the original Mac 128K, even while the end result was seen as underpowered, the hardware designers that built it did their best to pull a few nice tricks to save cost. Just assembling off-the-shelf commodity hardware into a replica felt like I would be doing the original design a disservice. So off to Taobao for some more exotic components I went!
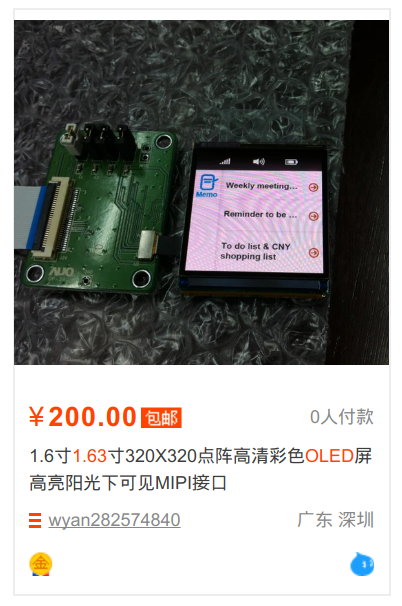
I decided to start with the display. The Mac had a fairly high-resolution display for its time, and finding a display to replicate that had a pretty high priority. In general, when it comes to displays available on the Chinese electronic market, there's a large choice available. Unfortunately, the 'large choice' seems to consist of either higher-resolution but larger screens, or alternatively tiny but lower-resolution screens. Ideally, I needed a resolution of 512x342 pixels; that is the native Mac resolution and on a screen like that, I would be able to display everything without rescaling. Unfortunately, screens with this resolution don't readily exist; the next best resolution up would be something like 640x480. Screens with that resolution, for some reason, tend to start out pretty big: the smallest viable one I could find was about 3.5". So unfortunately, I would have to do some downscaling if I wanted to make the Mac as small as possible.
After deciding it would be okay to downscale a bit, I had access to a fair amount more displays. One of the displays that popped up pretty quickly was the x163qln01, an 1.63" OLED screen made by AUO. While slightly expensive (about US$25 per screen), this display has good availability on Taobao and a datasheet that at least documents the pinouts, dimensions and power source requirements. This display seems to be made for certain Android smartwatches, and with some mangling of search terms, Google even spat out some initialization sequences I could use.
The only problem (well, aside from the connector that had pins a mere 0.5mm apart) was that the display did not use a parallel or SPI interface, but a MIPI interface. I'd have to tackle that later on.
With the choice of display made, I could move on to the processor. I grabbed an ESP32-Wrover module for this. This module contains an ESP32 (a WiFi chip with 2 32-bit CPUs running at 240MHz and about half a megabyte of RAM), 4MiB of flash and 4MiB of PSRAM memory. My guess was that the 2 CPU cores would be fast enough to emulate a Mac and that I could use the 4MiB of PSRAM memory to give the Mac its RAM. While 4MiB of flash is not that much, it should be enough for the emulator plus a small-ish hard disk with the system software and some programs. Also, it helps that I work for Espressif, making me pretty familiar with the hardware; what also helped was that I could just grab some modules from work instead of having to buy them and then wait for them to arrive.
With that, I was mostly set - the OLED still needed some components to be powered so the component count was increased by some LDO and other power supply chips. The Mac also needed sound so I sourced a cheap amplifier chip and speaker, and for power and debugging I pulled a common FT232 module out of a drawer somewhere. All these components are pretty small and allow me to scale down the enclosure, resulting in a model that would be a little bit bigger than 1/6th of a real Mac.